QUINTETT
Building instruction
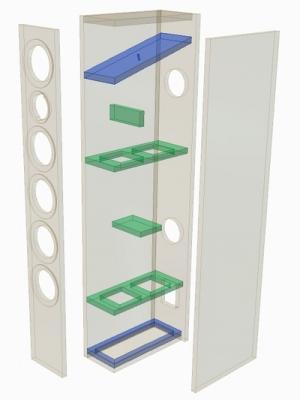
Exploded drawing
Assembly
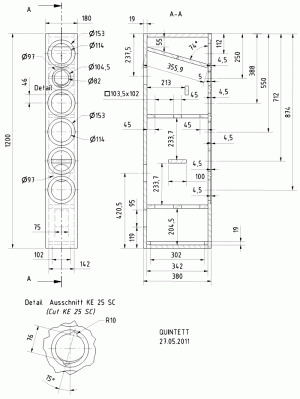
First, the 19 mm wood cabinet panels are butt-jointed and glued. To make construction easier, begin with the side panel. To this, glue the front panel, rear panel, lid and frame for the removable floor. The strengthening struts and dividers for the mid-ton camber can then be positioned and glued in place. The divider has to be bevelled as shown in the drawing and a hole (8 mm) drilled in it for the wires. Then the remaining side piece is glued in place and the floor screwed in place.
To provide maximum visual impact and acoustic quality, the drivers should be countersunk so that they are flush. You will need a router and a corresponding circle cutting tool for this. Finally, the openings for the drivers and terminals are cut out.
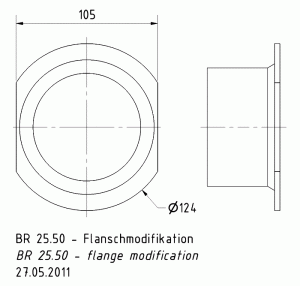
It is not possible to fit the bass reflex tubes without modifying the opening. As a result, the edge of the inner opening will have to be cut on the left and right (as shown in the drawing) to enable it to be passed through the corresponding speaker opening.
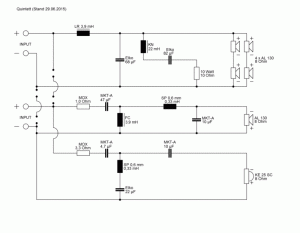
The bass crossover is attached to the removable floor while the mid-range to high crossover is fitted to the lower part of the front panel so that the PCBs are easily accessible later.
The hole for the cables in the mid-range driver cabinet should be sealed later with hot-melt glue or a similar substance.
Stability can be improved by fitting a larger base board whose design can be freely varied.
Inner damping
The damping material is loosely arranged in the cabinet. Two mats are placed inside the mid-range housing while 6 mats are placed in the woofer spaces. The space behind the bass reflex tubes should remain free.


